Fire-certified for public buildings EN 13501 B-s1,d0 Made-to-measure printing in your colours Delivery 10 to 15 days · DDP Europe
07 50 73 47 86 Free quote

Installation & mounting

How should you install your acoustic panels?

Invisible gluing, removable screwing, clip-on rails or cable suspension: every ACOUSTELIO product has its installation method, and it is simpler than you might think. A fixing kit, a marking template and step-by-step instructions come with every order.

Template suppliedMarking out with no room for error
Fixing kit includedMatched to your surface
1 to 2 h to installFor around ten wall panels
Step-by-step instructionsPlus phone support

Wall mounting

Three ways to fix a panel to the wall.

PET felt is light, around 2 kg per m2 at 12 mm: any sound indoor surface can take it. The choice comes down to your wall, your lease and whether you want to be able to take the panels down.

Adhesive mounting

High-performance adhesive or acrylic glue, applied to the back of the panel. Invisible, fast, no drilling: the go-to method on plasterboard, painted concrete, wood or sound tiling. Ideal for panels up to 12 mm and decorative layouts.

Best for: sound walls, permanent installation, zero drilling
Screw mounting

Screws and anchors suited to the substrate, driven through the felt (the head disappears into the fibre) or via rear brackets. A must on uneven or porous surfaces, recommended for large formats and workshop partitions.

Best for: large formats, difficult surfaces, clean removal

Rails & clips

Rails screwed to the wall, clips on the back of the panel: invisible mechanical fixing and panels you can remove individually without touching the wall. The solution for tenants, public buildings and walls that keep changing.

Best for: rented premises, frequent removal, technical walls

Technical drawings

The mounting details, in black and white.

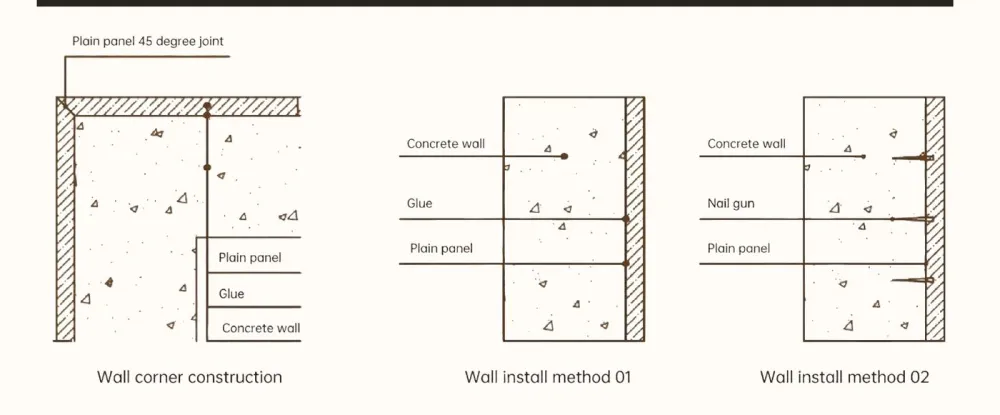
Extracts from our technical file: gluing principle, nail-gun fixing and 45-degree chamfered corners for crisp edges.

Technical wall-mounting sections: gluing onto a concrete wall, nail-gun fixing, corner detail

Wall fixing principles

Full-surface gluing or mechanical fixing: both standard sections, internal corner included.

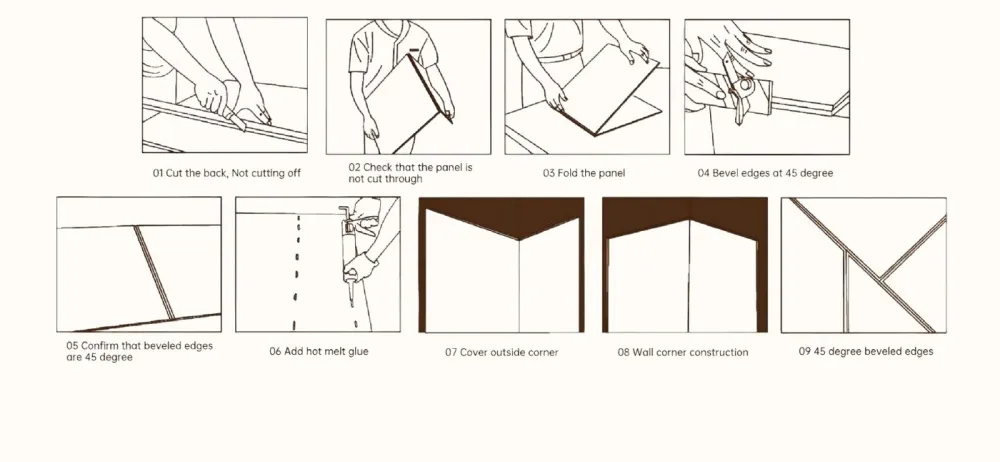
45-degree chamfering of acoustic panel edges for a clean external corner

Corners: 45° chamfer

To dress an external corner without a visible trim: chamfer, fold and glue. Available from our workshop on request.

Ceiling mounting

Baffles and rafts: suspended, adjustable, reversible.

The ceiling can be treated without heavy work: everything hangs on adjustable steel cables, compatible with suspended ceiling tiles and technical rails.

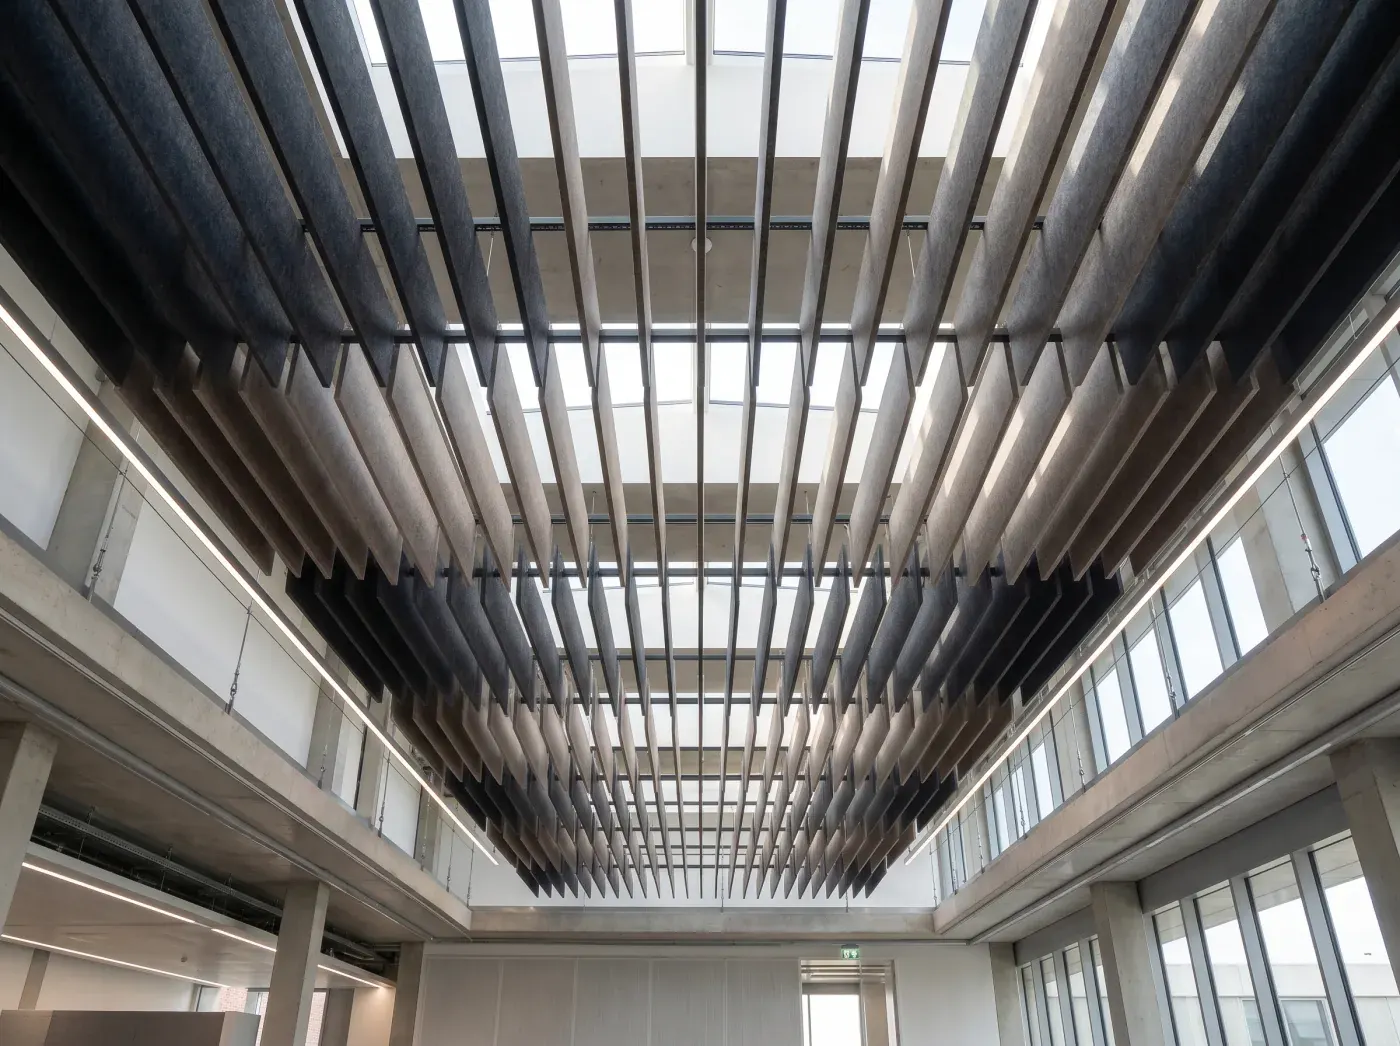
Acoustic baffles suspended from an open-plan office ceiling on adjustable cables

Vertical baffles

Blades hung vertically, on their own or in grids. Each baffle takes two adjustable cable hangers: concrete ceiling anchors, tile hooks or technical rail clamps. Recommended spacing of 300 to 600 mm depending on the absorption you are aiming for, height adjustable to the millimetre.

Rafts, clouds and grids

Circles, hexagons, clouds or crossed grids: same hangers, four points per raft for a perfectly level setting, or a deliberately tilted one. The fourteen ceiling systems in the catalogue list dimensions and spacing reference by reference.

Free-standing

Partitions on weighted feet and desk screens on clamps: no fixing to the building, so the space can be rearranged at will. See partitions and desk screens.

Method

Wall installation in four steps.

The detailed instructions and the template do most of the work: here is the essence, so you can picture it.

01

Prepare and mark out

Clean, dry surface, then mark out with a spirit level and the supplied template. This is the step that guarantees a flawless layout.

02

Fit the fixing system

Glue the back, fit the rails or drill the marked points: ten minutes per panel, no specialist tools.

03

Position

The panel lines up on its marks, then presses or clips into place. Joints are set with the supplied spacer.

04

Check

Alignment, plumb, even joints. A quick pass with a soft brush dusts off the felt and the space is ready.

Frequently asked questions

Installing acoustic panels: your questions.

Should acoustic panels be glued or screwed to the wall?
Both work, and the right choice depends on your wall and your lease. Gluing (high-performance adhesive or acrylic glue) is fast, invisible and perfectly sufficient for 9 to 12 mm panels on a sound wall: it is the most common installation in restaurants and offices. Screwing is the way to go on uneven substrates, for large formats, or when you want to be able to take the panels down cleanly. The rail and clip system combines both advantages: invisible mechanical fixing and panels that can be removed individually. Our article how to mount an acoustic panel walks through each method step by step.
Which surfaces can they be fitted to: plasterboard, concrete, tiles, wood?
PET felt is light (around 2 kg per m2 at 12 mm), which makes practically every indoor surface suitable: plasterboard, concrete, brick, wood, melamine and even tiles or glass with the glued method. On plasterboard, no special anchors are needed for glued installation; for screwed installation, standard self-drilling plasterboard anchors are enough. The only requirement is a clean, dry, dust-free surface. On flaking paint or a porous substrate, screws or rails are preferable to glue.
Can the panels be removed without leaving marks?
Yes, as long as you plan for it from the start. With the rail and clip system, panels unclip at will and only the rails stay screwed to the wall: ideal for rented premises or a space that keeps evolving. With screwed installation, you are left with anchor holes to fill, just like after taking down a shelf. Glued installation is the most permanent: removal can mark the paint. Mention your constraint in your quote request and we will recommend the right system.
Can I install the panels myself or do I need a professional?
Glued or screwed wall installation is within reach of anyone who can handle a spirit level and a drill driver: allow one to two hours for around ten panels, drilling template provided. Ceiling baffles and rafts call for a little more method (marking out the spacing, adjusting the cables): a tradesperson or an in-house facilities team fits them without difficulty using our instructions. For large wall layouts or technical ceilings, we can recommend professional installation.
How are baffles fixed to the ceiling, including under a suspended grid ceiling?
Every baffle ships with its hanging hardware: adjustable steel cables fixed to ceiling anchors, hooks for suspended ceiling tiles, or clamps for technical ceiling rails. The height adjusts to the millimetre on each cable, which lets you follow a slope or create waves. The recommended spacing (300 to 600 mm between baffles) is given in the instructions and in the catalogue, reference by reference.
What does the installation kit included with every order contain?
Every order ships with the fixing system matched to your configuration (high-performance adhesive, screws and anchors, rails and clips, or hangers and cables for the ceiling), a full-scale installation template for marking out, and the step-by-step instructions. The EN 13501-1 fire certificate and the NRC acoustic data sheet are included in the parcel for your compliance files.

2026 catalogue

The complete collection in an 18-page PDF.

36-colour chart, pattern boards, dimensioned ceiling systems, desk screens and certified performance data: everything you need to specify or price your project.

Download the catalogue (PDF)

Not sure which mounting method suits your space?

Describe your surface and your constraint (rented premises, public building, technical ceiling): we recommend the right system in the quote, free of charge and within 48 h.

Request a free quote