To mount an acoustic panel, four methods cover almost every situation: construction adhesive on a sound wall, clips or rails screwed onto drywall and brick, high-bond double-sided tape on painted glass, and cable suspension from the ceiling. The right choice depends on the panel weight, the surface and how reversible you need the fixing to be.
The topic is worth a closer look: according to French workplace-safety body INRS, the ambient level of an open plan office reaches 55 to 65 dB(A), whereas focused work calls for around 45 dB(A). A panel that is badly fixed or badly placed corrects nothing.
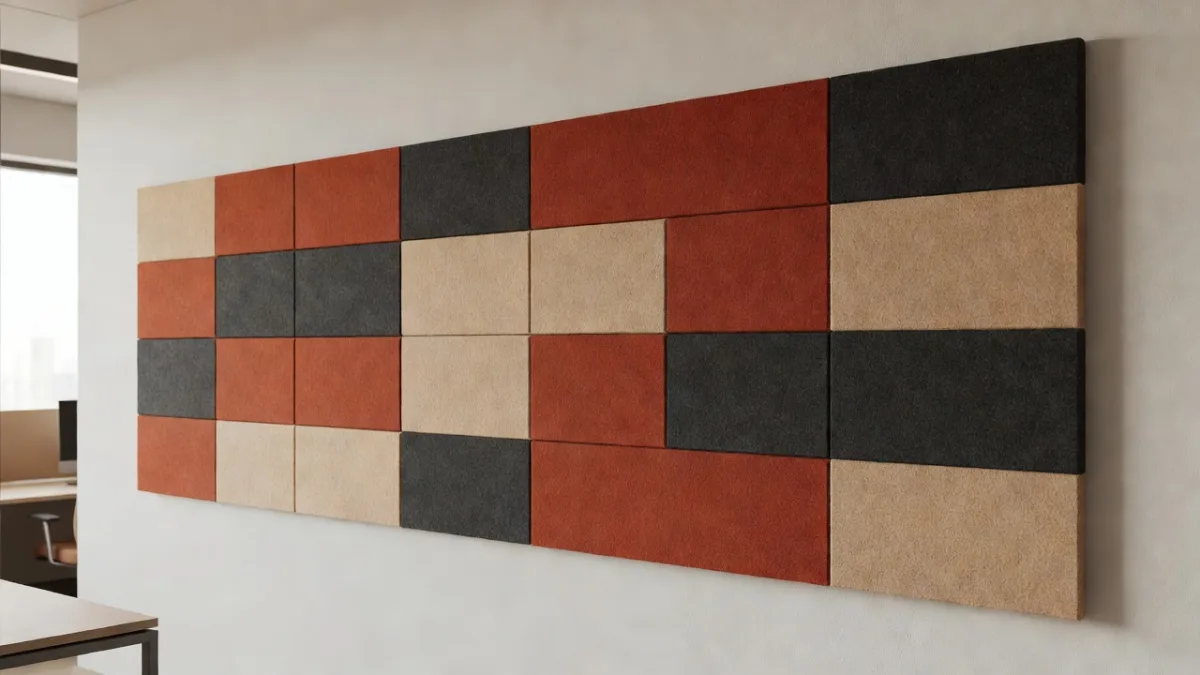
ACOUSTELIO manufactures made-to-measure acoustic panels in PET felt, with a measured absorption of NRC 0,85, an EN 13501-1 B-s1,d0 fire rating required in public-access buildings, and a tailored quote within 48 h. On our projects, most clients install the panels themselves in a single morning.
Good news: mounting an acoustic panel takes neither drywall-fitter skills nor a construction toolkit. A tape measure, a level, sometimes a drill, and a morning is enough. Our made-to-measure acoustic panels in PET felt weigh a few kilos per square metre, so adhesive or clips hold without trouble on most walls.
The real question is not the gesture, but the choice of method and location. Because a high-performance panel placed in the wrong spot absorbs barely better than a decorative frame, this guide details the fixing surface by surface, ceiling suspension, first-reflection zones and the mistakes we keep seeing in the field. It is exactly the protocol we share with every order, mounting accessories included.
Which fixing method should you choose for your surface?
The surface dictates the method: construction adhesive on sound painted concrete and drywall, screwed clips on brick and fragile partitions, high-bond tape on painted glass and tile, cables at the ceiling. Fixing an acoustic panel therefore starts with a diagnosis of the wall, not with a trip to the DIY store.
Run your hand over the wall. A chalking paint, old wallpaper or crumbling render rules out gluing straight away: the adhesive will hold, but the finish will come off with the panel. On a sound, dust-free surface, however, gluing stays the fastest and visually cleanest method.
- Drywall (12.5 mm plasterboard): acrylic construction adhesive on sound paint, or clips on self-drilling anchors if in doubt
- Concrete and rendered blockwork: MS polymer adhesive in beads, or a rail screwed onto hammer-in anchors for a removable fixing
- Brick and hollow clay brick: clips screwed onto nylon anchors; direct gluing on bare brick bonds poorly
- Painted glass, tile, laminate: high-bond double-sided tape (VHB type), after degreasing with alcohol
- Ceiling: suspension by steel cables on metal anchors, never adhesive alone above people’s heads
The table below sums up the method, difficulty and reversibility for each surface. Keep it handy on installation day.
| Surface | Recommended method | Difficulty | Reversibility |
|---|---|---|---|
| Drywall (plasterboard) | Construction adhesive or clips on self-drilling anchors | Easy | Medium (adhesive) to good (clips) |
| Concrete | MS polymer adhesive or rail on hammer-in anchors | Medium | Low (adhesive) to good (rail) |
| Brick | Clips screwed onto nylon anchors | Medium | Good |
| Painted glass, tile | High-bond double-sided tape | Very easy | Good |
| Ceiling | Steel cables on metal anchors | Medium | Good |
How do you mount an acoustic panel on the wall with adhesive?
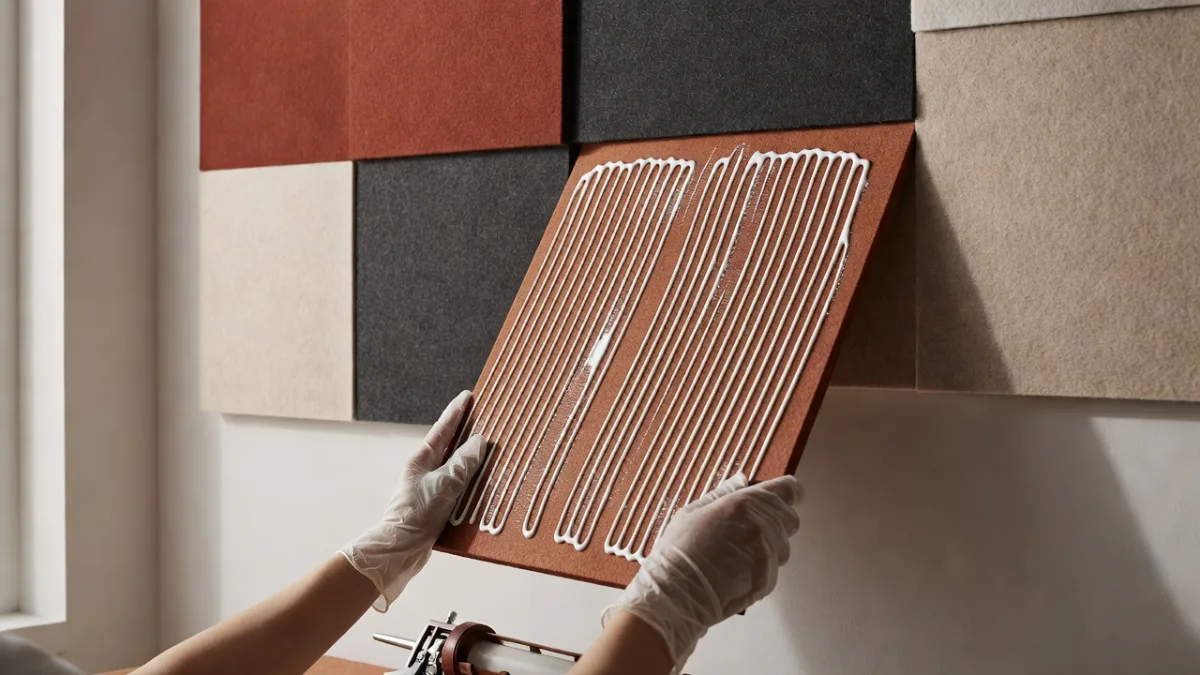
Gluing fixes a lightweight acoustic panel in four steps: mark out with a level, run adhesive beads on the back, position with even pressure, hold for a few tens of seconds. It is the method most of our clients choose for acoustic wall panels in PET felt, because it leaves neither screws nor cast shadows.
Mark out first. A pencil line struck with a spirit level for the top alignment, marks at the corners, and you avoid the tilted panel that shows the moment you sit down opposite. Then apply the adhesive in vertical beads spaced 10 to 15 cm apart rather than in blobs: since felt is flexible, isolated blobs create hard points and gaping areas.
- Acrylic adhesive: on painted drywall and plaster, solvent-free, it removes more cleanly if you take the panel down
- MS polymer adhesive: on concrete, wood and slightly uneven surfaces, strong and durable bond
- Pressure: press across the whole surface, from the centre to the edges, for about 30 seconds
- Weight limit: above 6 kg/m², a common rule among acousticians, switch to a mechanical fixing
That limit explains the difference between materials. PET felt stays well below the threshold, while a solid-wood panel or a weighted board almost always exceeds it. So if you are torn between two products, the weight per square metre is the first figure to check, even before the price.
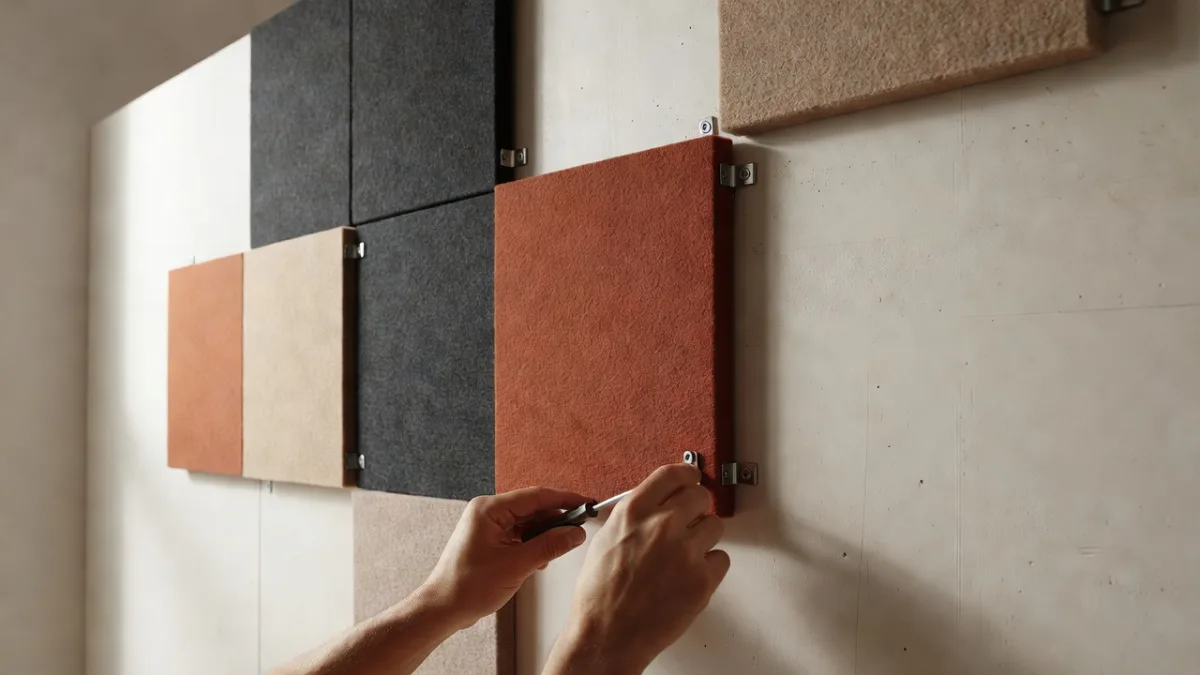
Clips, rails or tape: when should you avoid adhesive?
Three situations call for fixing acoustic panels without adhesive: a fragile or questionable finish, premises whose landlord requires a clean removal, and a smooth non-porous surface such as painted glass. Each has its dedicated solution, included or offered with our orders depending on the case.
Clips first. This is the fixing that is growing the fastest in 2026 on our professional orders, driven by commercial leases and public-access-building standards. Two or four supports screwed to the wall on suitable anchors, and the panel simply clicks onto them. Count on ten minutes per panel, stopwatch in hand. The advantage is replacement: a stained panel in a restaurant unclips and gets swapped out without touching the wall. Rails follow the same logic for long alignments, because a single level profile squares up an entire row.
- Clips on anchors: the solution for tenants and public-access buildings, damage-free removal, panel-by-panel replacement
- Wall rail: ideal for a mural of several aligned panels, one single layout for the whole row
- VHB tape: on painted glass, tile or laminate degreased with alcohol, holds several kilos per strip
- To avoid: bargain adhesive pads, which let go with temperature swings
On that last point, our stance is clear-cut: entry-level tape is the worst false economy on the acoustic market. We have seen panels on the floor three weeks after a summer install under a glass roof. In the end, a high-bond strip costs a few euros more and holds for years.
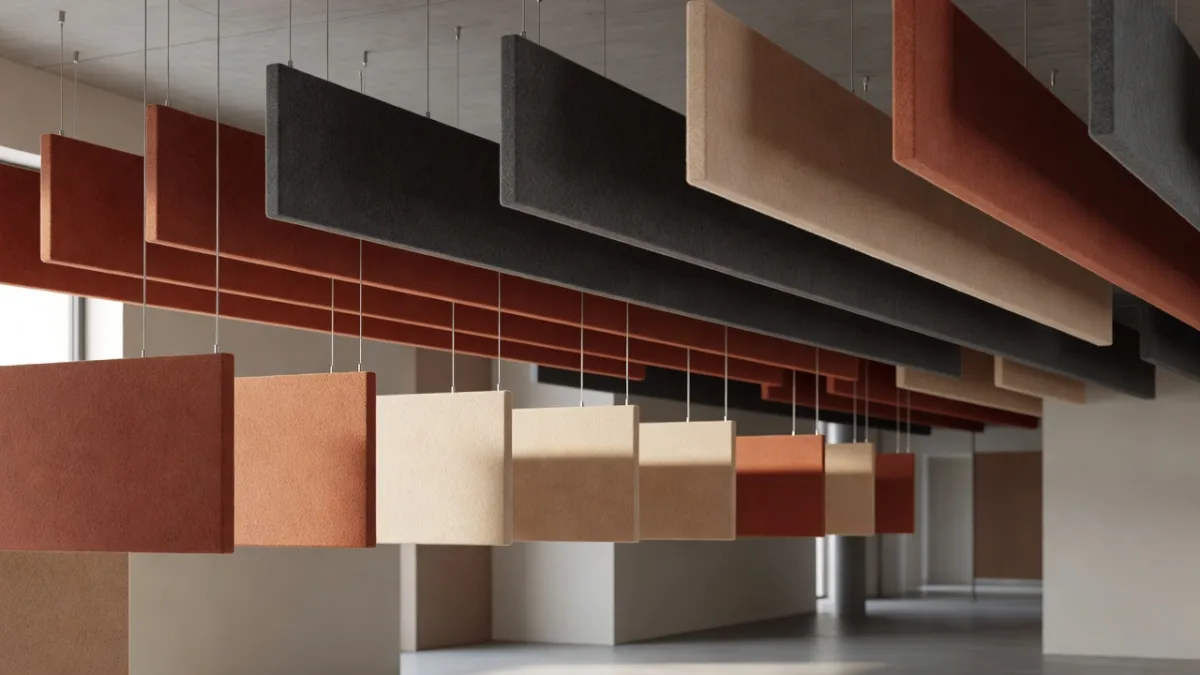
How do you hang your panels from the ceiling?
Ceiling suspension means anchoring metal fixings into the slab or the joists, then adjusting steel cables that carry the panel flat or as a vertical baffle. It is the go-to method for large volumes, restaurants and open plan offices, when the walls are glazed or already occupied.
Two configurations exist. The horizontal panel, hung 15 or 30 cm below the slab, treats overall reverberation by absorbing on both faces. Vertical ceiling baffles, hung on edge in parallel rows, offer more absorbing area per square metre of ceiling and let the light from existing fittings pass through.
- Anchoring: expansion metal anchor in concrete, screw hook into a wooden joist, never a plastic plug alone at the ceiling
- Adjustable cables: they take up the slab’s out-of-level and fine-tune to the millimetre after hanging
- Clear height: leave at least 2.20 m under baffles in circulation zones
- Spacing: baffles every 40 to 60 cm strike a good balance between absorption and budget
A word on safety, because the subject is non-negotiable above people’s heads: check the allowable load of each anchor point and double up the fixings on large formats. Our ceiling kits are sized with a wide margin, and PET felt, light by nature, hugely simplifies this calculation compared with wood or plaster panels.
Where and at what height should you place your panels for audible results?
A wall panel goes at ear height, between 1 m and 2 m from the floor, on the first-reflection zones: side walls, the large bare wall facing the noise source, and the ceiling in tall rooms. Placement counts as much as the surface area installed in the final result.
To find these zones without any calculation, use the mirror trick. Sit in your usual spot and have someone slide a mirror along the wall: every point where you can see the sound source (the neighbouring table, the workstation opposite) is a reflection point to treat. Simple, free, remarkably reliable.
- Side walls: first reflections of voices, absolute priority in offices and meeting rooms
- Wall facing the source: it sends sound straight back to the occupants, treat it second
- Ceiling: the dominant surface as soon as the height exceeds 2.70 m or the floor is hard
- Distribution: three partially treated surfaces beat a single wall saturated with panels
And the quantity? You often read that you should cover 40 to 60 % of the walls. Frankly, that figure is oversized for a high-performance absorber: standard NF S31-080 targets a reverberation time of 0,4 to 0,8 s in an office, an aim consistent with the guidance from INRS on workplace noise. At ACOUSTELIO, we find on our projects that with a felt rated NRC 0,85, treating 15 to 30 % of the wall and ceiling area is generally enough to reach an average 50 % drop in reverberation.
What tools do you need and how long does the install take?
The full install of a room happens in one morning with five tools: tape measure, spirit level, pencil, glue gun or screwdriver depending on the method, and a step ladder. At ACOUSTELIO, we find on our projects that almost all clients install the panels themselves, without a tradesperson, using the accessories included in the order.
A typical morning looks like this. Half an hour of prep: dusting the wall, marking out reference points, sorting panels by location. Then the install itself, between 5 and 15 minutes per panel depending on the method. Finally the check: a step back, a level check, and the hand-clap test that makes the difference audible right away.
- Measuring and marking: tape measure, spirit level of at least 60 cm, erasable pencil
- Gluing: cartridge gun and a cloth for excess, nothing else
- Screwing: cordless drill/driver, bits suited to the surface, anchors supplied in our kits
- Any cutting: PET felt is re-cut with a fresh utility-knife blade against a metal straightedge
This simplicity comes from the format: our panels arrive cut to the dimensions approved on the artwork proof (BAT) before production, delivered DDP within 10 to 15 working days. In other words, no heavy on-site rework. And when the project goes beyond standard (cut shapes, printing in your colours, large wall murals), our made-to-measure workshop adapts the fixings to the panel’s design.
What mistakes make an acoustic panel fixing fail?
Install failures almost always come from four mistakes: a poorly prepared surface, a fixing undersized for the weight, a location chosen for decoration rather than acoustics, and forgetting the public-access-building rules. All are avoidable with ten minutes of checking before you reach for the drill.
The most common mistake stays gluing onto questionable paint. The adhesive holds, the paint does not, and the panel falls, taking a sheet of finish with it. When the wall is over ten years old or its history is unknown, test with a piece of strong tape: if it pulls off flakes when removed, go straight to clips.
- Neglected surface: dust, chalking paint or damp ruin any adhesive
- Underestimated weight: above 6 kg/m², mechanical fixing is not an option but an obligation
- Decorative placement: a panel centred over the sofa can miss the reflection zones entirely
- Public-access building without fire test report: in a public-access establishment, every material installed must justify its EN 13501-1 rating
On that last point, let’s be honest: a perfect fixing never makes up for a non-compliant product. That is why we deliver the B-s1,d0 classification test report with every order, and our “compliant or remade” guarantee covers the rest, photo evidence within 48 h. The projects published in our case studies show what a well-thought-out install delivers, from restaurant to open plan office.
Frequently asked questions about mounting acoustic panels
Can you mount an acoustic panel without drilling?
Yes, a lightweight PET felt panel can be fixed without drilling, with construction adhesive or high-bond double-sided tape. Adhesive suits sound painted walls, tape suits smooth surfaces such as painted glass or tile, after careful degreasing with alcohol. This approach appeals to tenants and businesses on a commercial lease, because removal stays clean with a little method and a cheese-wire to cut the glue. It does reach its limits with heavy panels: above roughly 6 kg/m², mechanical fixing with clips or rails becomes mandatory for safety. So the weight per square metre of your panel decides above all.
What adhesive should you use for an acoustic panel?
An acrylic construction adhesive is enough for a PET felt panel on painted drywall or plaster, and an MS polymer adhesive is called for on concrete, wood or a slightly uneven surface. Solvent-free acrylic removes more easily if you take the panel down, while MS polymer gives a stronger, more durable bond. Apply the adhesive in vertical beads spaced 10 to 15 cm apart rather than in isolated blobs, because flexible felt hugs the wall better with continuous lines. Avoid neoprene adhesives indoors: their solvents release volatile compounds and add nothing on a light panel. One cartridge generally covers 3 to 4 standard panels.
How do you mount an acoustic panel on drywall?
On drywall in good condition, acrylic construction adhesive holds a PET felt panel without trouble, since its weight stays well below the board’s capacity. If the paint is old, chalking or of unknown origin, prefer clips screwed onto self-drilling drywall anchors, which each support several kilos and go in without a hammer drill. Drywall dislikes concentrated pull-out loads, so always spread the fixing across several points rather than on a single central hook. For a heavy or very large panel, aim for the metal studs of the frame, findable with a detector, and you will get a hold equivalent to a solid wall.
At what height should you fix a wall-mounted acoustic panel?
The effective height sits at the occupants’ ear level, that is between 1 m and 2 m from the floor in most rooms. This is the zone where voices travel and where the first sound reflections hit, the ones that degrade the intelligibility of conversations. In an office, centre the panels on the seated position, around 1.10 to 1.30 m. In a restaurant, go slightly higher to cover seated guests and standing staff. Placing panels too high, near the ceiling, stays the classic mistake of purely decorative installs: the look is elegant but the treatment misses part of the useful reflections. A mirror slid along the wall reveals the right spots in a few minutes.
How do you hang an acoustic panel from the ceiling?
Suspension is done with adjustable steel cables, anchored into the concrete slab with expansion metal fixings or screwed into wooden joists. The panel is then set horizontally, 15 to 30 cm below the ceiling to absorb on both faces, or vertically as a baffle to densify the absorbing area in large volumes. Count on four anchor points per horizontal panel and two per baffle, with a comfortable load margin on each fixing. Leave at least 2.20 m of clear passage under suspended elements in circulation zones. PET felt, being light, makes this install accessible to two people equipped with a step ladder and a laser level.
Does a badly fixed panel lose acoustic performance?
Yes, but the main issue lies elsewhere: a badly positioned panel loses far more performance than an imperfectly flattened one. Absorption depends on the material and the surface exposed to sound, so a slight gap behind the panel does not penalise the result. A partial peel mainly creates a fall risk and a visual defect. Conversely, panels concentrated on a single wall or placed outside the reflection zones can halve the real gain, even perfectly installed. That is why our layout plans specify the location of each panel before delivery: on our projects, this preparation explains the average 50 % drop in reverberation observed, more than the fixing method chosen.
You now know how to mount each panel according to your surface, your ceiling and your reversibility constraints. What remains is sizing the project: area to treat, formats, colours and accessories suited to your walls. Request your tailored quote, reply within 48 h with a layout plan, and receive panels ready to install in one morning, fixings included.